
Starting With The Basics
The V-Synth's keyboard and bend lever are pretty typical for most Roland models since the late '80s. The five-octave keyboard, C to C, is one of the better synth-weighted keyboards. The keys are full size, have enough travel but not too much, and the stop blocks are just well enough damped. The keyboard is pressure (channel aftertouch) sensitive, and while this tends to be on the heavy side, it doesn't appear to suffer from the pressure sensor degredation of earlier Roland models. Of course, velocity and release velocity are sensed, although I haven't found anything that the V does with release velocity. (The system mode provides sensitivity adjustments for both velocity and aftertouch.) The key edges are blunted just enough to prevent glissandos from being painful, although the black keys do stand a bit high for the purpose. The white key ends have lips of about 1/8-inch, which do not overhang the lower front edge of the case (unlike some earlier Roland models).
The V has Roland's characteristic T-handle combined pitch bend and modulation control. Rocking it left or right affects pitch bend. (The amount of bend is a patch parameter; up and down can be set to different ranges.) It returns to zero reliably without a noticable center detent. Pushing the stick towards the back of the synth adds modulation (which is a routable parameter via the control matrix, explained below). It is spring-loaded in both axes. The modulation axis has a lot of travel compared to most other Roland synths I've played.
Patch Selection and Storage
Many Rolands have a set of eight "bank" and eight "patch" buttons, allowing for eight patches to be selected with a single button press, and 64 patches accessible in a maximum of two button presses. However, the V-Synth has far more patch memory than that -- 512 patch locations. Roland came up with a clever way of addressing this. At the patch main screen, on the left side of the screen is a "List" button. Through this, you can access all patches, in numerical order or by category.
However, 64 patches can be assigned as "favorite" patches, accessible from the patch buttons in addition to the on-screen list. The patch buttons are shown below:

Holding down the assign button and pressing one of the 1-8 buttons assigns the current patch to that button in the current bank. (Note that this does not effect patch memory; the patch remains where it was in the on-screen patch list.) To change banks, hold down the bank button and press one of the 1-8 buttons. If you forget what bank you are on, hold down the bank button and the appropriate 1-8 button will flash; also, the screen will display the names of the eight patches assigned to that bank.
Note that all patches, as well as all PCM sounds and samples on board, are stored in a larger overarching structure called a "project". We'll have more to say about this in the next installment.
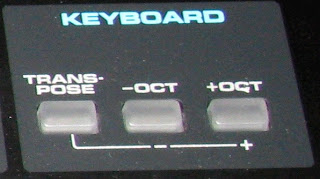
Keyboard Transpose
The Keyboard Transpose buttons can transpose the keyboard any desired number of half steps, or quickly transpose by octaves. The latter can be handy when you need to shift the range of the keyboard, say, for a bass or lead patch. These are shown below:
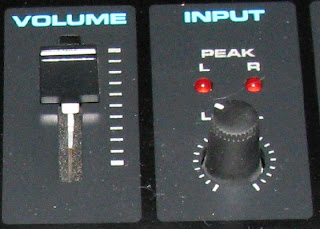
Volume Controls
The master volume controls the output levels of all outputs, including the direct outs and the digital outputs. The external input level knob controls the level of any signal coming in through the external inputs; a red LED indicates clipping. (There are also input preamp gain knobs on the rear panel.) These are shown below:
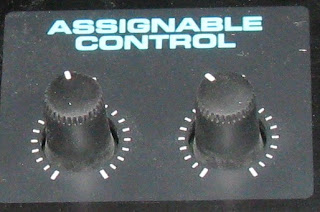
Programmable Knobs
These two knobs can be programmed in the control matrix to provide real-time control over any desired parameter. One thing to note about them is that, unlike the patch editing knobs, the programmable knobs are "live" the moment a patch is selected; if the knobs are not centered, the parameters they control will be effected immediately. Further, these knobs do not edit the patch; they are like MIDI controllers in that respect. (In fact, they are MIDI controllers. They can be set to transmit MIDI CC messages.) The programmable knobs are shown below:
The Cool Toys: Time Trip Pad
Having gone through the undercard, we now come to the main event. What's the first thing that catches the eye of everyone seeing a V-Synth for the first time? Yes, it's the Time Trip Pad! So how does it work? What does it do? And how about that weird slot in the top of the case labeled "D-Beam"?
The Time Trip pad operates in one of two modes: Time Trip mode, and assignable (or "X-Y") mode. In Time Trip mode, the pad operates in a polar, or R-theta mode. You operate it by placing your finger somewhere on the outer circle, and moving it in a clockwise or counterclockwise direction, quickly or slowly (or you can stop). When you do so, you are taking direct control of the time aspect of the Variphrase processing. Recall that Variphrase makes pitch and time independent parameters. When you touch the pad, time freezes. Moving your finger in a clockwise circle causes time to advance, at the speed you move at. A typical example used to demonstrate it is to set up a patch with a basic vocal sample. Touching the pad and moving your finger in a slow clockwise circle causes the vocal sample to proceed as if the person who was sampled was speaking
veeeeeeeeeerrrrrrrrrrrryyyyyyyyyy
sloooooooooooowwwwwwwwllllllllllyyyyyyyy.
Moving your finger in a fast circle causes the vocal sample to be renderedveryfast! The effect is quite different from rocking a tape reel or scratching on a phoograph because the tone of voice of the sample remains normal. If you go very slowly, you can hear individual sibiliants, clicks, thumps, and transient vowel sounds and vocalizations that we don't normally consciously hear in speech. The effect is quite weird. Moving your finger in a counterclockwise circle causes time to go backwards, so in the case of our vocal sample, it will sound like a reversed tape. Here is the Time Trip pad and its mode buttons:
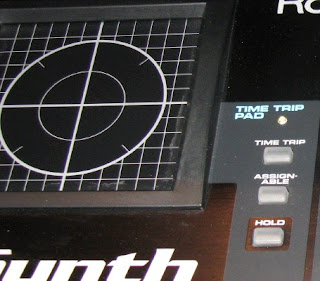
When you take your finger off the pad, time reverts to advancing normally, unless you have engaged the "Hold" switch to the right of the pad. In this case, the pad retains the last position touched until you touch it again, meaning that time will "freeze" when you take your finger off the pad.
In the Time Trip mode, an additional parameter of your choice can be controlled by how far away your finger is from the center of the pad. This is set up in the control matrix (discussed further down).
When Assignable mode (often referred to as "X-Y" mode in the patch editing screens) is selected, the pad controls two parameters of your choice. One parameter is effected by vertical movement of your finger, the other by horizontal movement. You select which two parameters you want to control in the control matrix. The zero position of the pad is determined by how you set up the parameters in the matrix; normally, this will be the center of the pad, but you can set it up differently if you want. Whenever you take your finger off the pad, the parameters being controlled will revert to zero unless the Hold button is on; in this case, the pad will remember the last position touched until it is touched again.
In either mode, the blue light next to the pad will light whenver the pad is controlling something, either because it senses a touch, or because Hold is on.
Here is a demonstration of the Time Trip pad being used on a vocal sample. The patch has the vocal sample on OSC 1; OSC 2 is off. COSM 1 has a comb fiter selected; COSM 2 is off. The R parameter of the Time Trip pad is controlling the center frequency of COSM 1; you can hear this when I move my finger closer to the center of the pad. At about 1:40, I engage the hold switch. The squealing noise heard in places is an artifact of the low-quality sample.
D-Beam
The D-Beam is an infrared range sensor; it senses how close your hand (or any other object over the panel) is to the sensor. The distance is translated into a value for a control parameter. The sensors are buried in a slot in the panel, with big blue LEDs on either side of it. Depending on the calibration, the D-Beam will trigger whenever an object is 18-24 inches (45-60 cm) above the slot. Note that this may be a problem if you set up the V-Synth on a multi-keyboard stand with another keyboard above it; the D-Beam will sense the bottom of the keyboard above. (I'm having this problem right now; my D-Beam is picking up the bottom of the Juno-106 on the tier above. And I've got that tier as high up as it will go on the stand. I don't want to put the V-Synth on top because the touch screen will be hard to read if it's up too high.) The manual mentions that the useable range may be reduced if the sensor is exposed to direct sunlight. I haven't tried that; I do have the V right in front of a window, and light coming in has not caused a problem. The D-Beam and its mode buttons are pictured below:

Many players who have played with a V-Synth in the store may not realize, and it isn't well explained in the manual, that there are actually two sensors in that little slot. The beams are pretty close together, so just moving your hand randomly over the slot is likely to activate both of them. You have to stay over to the side to only activate one sensor. You can tell when you are doing it right because only the blue LED on that side will light. Operating both sensors independently, with one hand, is a bit of a feat. I've had some success with holding my hand with my index and pinky fingers extended, while the middle and ring fingers are curled in (the "devil's horns" hand sign) and rotating my wrist this way and that to change the relative distances of the two fingers above the sensors.
The D-Beam has four operating modes, which I'm going to address out of order for clarity. The Pitch mode make the D-Beam a pitch bend control. Being that it's a unidirectional sensor, it can only bend in one direction, either up or down depending on how you set it up in the patch. However, if your patch is using PCM oscillators with stereo samples, the two sensors will bend the left and right channels independently, which is pretty cool. The second mode is Time, which instead of pitch bending performs time bending. As you move closer to the sensor, time slows down, while pitch is maintained thanks to Variphrase. Again, if you are using stereo PCM waveforms, the two sensors will operate on the left and right channels independently.
The Assignable mode sets up the two sensors to control two parameters of your choice, per your selections in the control matrix. The Time Trip mode, like the Time Trip pad, is motion rather than position sensitive. To make time advance, you move your hand towards and then away from the sensor cyclically. This is kind of difficult; there is a "turning point" at each end of the travel that you have to reach. If you don't, then when you reverse direction, time will go backwards. I'm not sure how useful this is, considering that the Time Trip pad provides the same effect and is easier to control. Unlike the pad, the D-Beam does not have a hold function.
Arpeggiator
An old favorite that went away a long time ago returns: the arpeggiator. Analolg old-timers will recall that the old Jupiters and Junos (up to the Juno-60) offered an arpeggiator that allowed the performer to hold a chord on the keyboard and the synth would play an arpeggiation of the notes held. The effect was commonly used in the late '70s and early '80s; among other things, it provided a way to simulate the analog step sequencers found on the large modular systems of the day. Here are the arpeggiator panel controls:

Well, this isn't your Juno-60's arpeggiator. The simple front panel controls disguise just how sophisicated the V's arpeggiator is. The on/off button is obvious; it enables or disables the arpeggiator. The knob controls the rate. The hold button causes the arpeggiator to "lock on" to any note struck, even after the note is released. What this is good for will be explained momentarily.
The real capabilities of the arpeggiator are in the patch settings, accessible through the touch screen. The arpeggiation can run a number of different patterns, or "motifs": ascending, descending, alternating, random. It can also arpeggiate the notes in the order that you struck the keys. These do pretty much what you expect. However, you can also build your own patterns, and it's here where some of the power becomes evident. In a user pattern, all notes in the pattern need not have the same time value. Duration as a percentage of the note value can be controlled, and tied/slurred notes can be set up. Rests can also be inserted. Two special motifs that can be used with a user pattern are the fixed motif, in which the pattern actually specifies a fixed sequence of notes (used with drum kit patches), and a motif in which a held key specifies what key the pattern plays in. You can also limit the range of the keyboard over which the arpeggiator operates. This is where the arpeggiator hold button becomes useful: you can play an arpeggiation, hold it, and then play a lead or some other part on the part of the keyboard that is excluded from the arpeggiator, while the arpeggiation continues to run. The default rate is a patch parameter, or you can set it up to sync the arpeggiation to received MIDI Clock messages.
V-Link
The V-Link provides the ability to control an Edirol video pattern generator and display system by what is played on the synth. The intent is to provide synchronized audio and video performances, a concept that flashes back to the late '60s when concerts were frequently accompanied by visuals from slide or film projectors creating abstract patterns. I don't have one of the Edirol video generators, so I can't say much else about V-Link. I will note that, from reading the description in the manual, it appears to take over the MIDI Out port when it is on.
The Missing Button: Portamento
The V has a good portamento capability. All portamento parameters are stored with the patch. Constant-time and constant-rate modes are available; up and down times are independently settable, and a legato mode is available which activates the portamento only when playing legato. So what's missing? There is no button on the panel to turn portamento on and off. I think this is the first synth I've ever seen which had portamento but no panel control for it. To turn it on or off, you have to go into the patch parameters.
Using Your Feet
The V has a hold pedal input and not one but two expression pedal inputs. The hold jack can be set up for either a normally-closed pedal (Roland's standard) or a normally-open pedal (nearly everyone else's standard) in the system settings.
The Control Matrix
All of the V-Synth's real-time controllers -- keyboard aftertouch & velocity, the modulation axis of the bend lever, the assignable knobs, the R dimension of the Time Trip pad, the X and Y dimensions in the X-Y mode of the pad, and the assignable mode of the D-Beam -- are routed to parameters via the control matrix. The matrix has eight source slots, each of which has two destination slots. To set up a routing, you pick an empty source slot and choose a source. Then, you can choose one or two destinations and set the sensitivity of each. There are about 75 possible destinations, so I won't list them here; download the manual from Roland if you're interested. The sensitivity effects how much the controller effects the destination parameter, in either direction; it can be set positive or negative.
In order to record MIDI from the real-time controllers (other than aftertouch and velocity), each controller is assigned to a MIDI Continuous Controller number in the system mode settings. Although it is possible to select a MIDI CC number directly as a source in the control matrix, it will probably be less confusing to use the CC numbers assigned to the controllers. This will be covered in Part 5.
Until Next Time
The next installement, Part 5, will cover all aspects of the V-Synth's audio and MIDI I/O. There are aspects of how the controllers, the arpeggiator, and MIDI interact that aren't well explained in the manual. I'll be doing some research and experimenting on these. Also covered in Part 5 will be the V's USB interface, which is quite powerful but requires some care in setup and use. I'll go through how the V structures its internal storage and show you how to use the USB without fouling up the operating system.
No comments:
Post a Comment