I've had several people asking me how I got a MIDI interface to work with my EML 101. I haven't answered the question yet because... well, to tell the truth, I don't remember exactly what I did, and unfortunately I can't remember which forum I posted the article where I did it. And Google isn't turning up anything.
I have the 101 on the bench now for calibration. While I've got it out, I'll reconstruct the mods that I made in order to be able to input a control voltage and gate. One thing I have to point out: I did not mod my 101 so that it will work with 1V/octave scaling! Several years ago I purchased a JKJ Electronics CV-5, which is scalable to the 1.2V/octave EML scaling, and that's what I use. Unfortunately the CV-5 is now out of production. I don't know whether other MIDI interfaces on the market can be scaled to 1.2V/octave or not. However, it would not be too hard to build a little circuit that would re-scale a 1V/octave control voltage to 1.2V/octave. I'll draw up one and post it.
It will probably be a few days because... now that I have my 101 on the bench, I can't get it to scale with its own keyboard. The linearity and scaling trim pots are all on the stops and it's still not close; I'm only getting a span of about 2 octaves across the keyboard. The really odd thing is that it's happening on both the KB1 and KB2 busses, which are almost totally independent circuits. Tomorrow I'll start by checking the 4.4V internal reference voltage.

Tuesday, April 26, 2011
Sunday, April 24, 2011
Review: Oakleysound EFG envelope follower
I recently purchased an Oakleysound EFG, pre-assembled from Krisp1 in the UK. (Oakley itself does not sell assembled modules.) This is a combination preamp, envelope follower, and gate generator. The module was on sale for (if I recall correctly) £110, which after exchange to American currency and shipping, worked out to a total cost of $195 US. Shipping time was about a week, and the module arrived well packed and protected.
This particular assembly is based on the issue (version) 4 board from Oakley. The one I bought is formatted as a 1U width MOTM-format module:
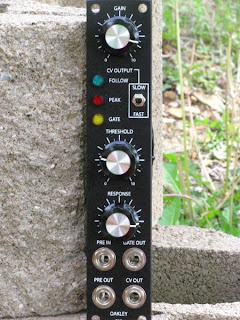
Oakleysound EFG, as assembled by Krisp1. Note that this panel layout is different from the 1U panel shown on the Oakley Web site.
What is an Envelope Follower?
So what is an envelope follower? Well, you know what an envelope generator is. It creates a signal whose (primary) purpose is to represent the volume of a sound over time; the signal is intended to be used as the control input to a VCA. An envelope follower, rather than creating an envelope from scratch, accepts an audio input and then outputs a control voltage that is proportional to the volume of the input audio at any given moment. The louder the volume of the input signal, the higher the control voltage output.
The Oakley EFG also contains a gate generator, that turns on when the input signal rises above a set level, and turns off when it drops below that level. For instance, as an alternative to having a VCA track the input level of your source, you could use an envelope generator connected to the VCA to re-shape the input signal's envelope. For this, you connect the EFG's gate generator output to the gate input of your envelope generator. The EFG's gate serves as an alternative to the normal gate signal that you would get from a keyboard connected to the synth.
EFG Features and Controls
An obvious application of an envelope follower is to make a VCA follow the envelope of some sound produced externally from the synth, such as the sound of a conventional instrument picked up from a microphone or electromagnetic pickup (e.g., electric guitar). These instruments and devices produce signal levels that are far lower than the signal levels used in a modular synth. Towards that end, the EFG incorporates a high-gain, high-impedance preamp, into which you can plug in a dynamic microphone, a self-powered condenser microphone, or an electric guitar/bass directly. The preamp has a very wide gain range, so that it can also accept line-level signals. It provides its output directly to the envelope follower's input; the preamp output is also available directly at a panel jack. A red "PEAK" LED on the panel indicates the onset of clipping in the preamp.
The envelope follower itself follows whatever signal is input to the preamp. A green "FOLLOW" LED on the panel lights up to indicate the control voltage being output; brighter indicates a higher voltage. This version of the EFG provides only one control for the envelope follower itself: a panel switch that selects slow or fast tracking. (Apparently the board can accommodate a pot that allows the envelope generator tracking speed to be varied.)
The gate generator outputs a gate signal that indicates the presence of a signal at the audio input. The gate is at 5V when a signal is present, and at ground when the signal is absent; this is pretty much the standard for modular gear. (It might or might not work with other synths; for instance, it won't work with Moog or Yamaha gear without conversion circuits.) The yellow "GATE" LED lights when the gate is active. The primary use of the gate is to control an envelope generator, in the same way that a keyboard gate does. You could then use the envelope generator to re-shape the audio signal. For instance, by setting your envelope to a fast attack, slow decay, and zero sustain level, you could make an instrument that sustains indefinitely (say, a saxophone or a violin) fade out like a piano.
The THRESHOLD control on the panel determines the level that the input signal has to reach in order to be considered "active". The RESPONSE control adds hysteresis to the threshold level; as you turn the control to the right, the turn-on level goes higher while the turn-off level goes lower. You can use this sort of like a noise gate. If your input signal is a source that fades out gradually, like a guitar or piano, you can set the control to a slow setting so that it the gate remains active for a time after the signal fades below the turn-on threshold. It helps prevent the gate from thrashing back and forth when the signal level is near the threshold. I found that when using an electric bass as the source, I had to set this to a high value to prevent the gate from chasing the waveform; in other words, turning on and off with each cycle of the waveform.
Using the EFG
I tried several things with the EFG. My first patch was to plug an electric bass into the EFG's audio input. I routed its audio output to an MOTM-190 VCA configured as a ring modulator, and fed the output of a VCO to the 190's other input. The output of the 190 went to a Dotcom Q109 VCA which served to actually control the level of the output signal.
I started by connecting the EFG's control voltage output to the Q109's control input. With this configuration, I could play the bass and have its output ring modulated against the VCO. The output from the Q109 tracked the envelope of the bass, so that notes played on the bass attacked and decayed the same as if I were playing directly through an amp. That worked well with the envelope follower tracking switch on SLOW; when I put it on FAST, the envelope generator chased the waveform somewhat. That was actually kind of interesting, but not what I was wanting at the moment.
Next, I plugged in an electric guitar. With the MOTM-190 still configured as a ring modulator, I unplugged the control voltage output from the Q109 VCA. I then plugged the EFG's gate output into a Q108 envelope generator, and plugged its output into the Q109. I was able to obtain steel-drum-like sounds by setting the envelope for minimum attack, short decay, and zero sustain. With a longer attack and high sustain level I could get things that sounded like radio interference, or detuned violins; it helps if you turn the RESPONSE control up so that the gate remains active long enough to reach the sustain phase. One thing that doesn't work is to set up for a long release and then mute notes on the guitar: no matter what you set the envelope generator release to, the VCA can't amplify a signal that isn't there! That's one thing you have to get used to when you use an instrument with an envelope follower.
I did find that it was rather difficult to set the THRESHOLD control to get the gate to behave exactly the way I wanted. With a moderate setting of the RESPONSE control, the threshold range between the point where the gate would go off too soon, and the point where it would stay on indefinitely due to noise picked up by the guitar, was pretty small -- between the 2 and 3 positions. Turning the gain up helps some, but then you get into clipping in the preamp section. If I were seriously going to use the guitar as an input to the EFG in a patch, I'd probably put a compressor in line ahead of the EFG.
Technical Details
The EFG circuitry consists of a single board, mounted at a right angle to the panel and secured to it via the three pots, in the style of most MOTM 1U width modules. The build quality is excellent; the soldering is very clean and the leads to the panel-mount components are nicely dressed. The board came equipped with the MOTM 4-pin power connector; there is also provision on the board to install a Dotcom power connector. A MOTM-style power cable, with latching connectors, was shipped with the module.

All ICs are socketed, for easy replacement if needed. The board has ferrite beads to clean up in the incoming power, and diodes to protect against the power cable being plugged in backwards. I couldn't figure out what brand the pots are, but the feel is smooth and I didn't notice any glitches when turning the knobs. The jacks are Switchcraft enclosed jacks, which are top-quality parts.
I did some tests to look at what kinds of voltages were coming out. For the envelope control voltage, with no input, the output is at zero volts, as you might suspect. I set up an input signal and varied the gain so that it was just below the point where the PEAK light comes on; at this level, the envelope follower outputs 6 volts. It will go higher, past 10V, if you let the input stage be overdriven, but of course at this level the preamp's audio out won't be very useable.
The gate outputs 7V when active, and I verified that it will gate an Encore Electronics universal event generator (a module that is known to be picky about its gates). With the gate THRSHOLD and RESPONSE controls set full counterclockwise, the gate threshold occurs at the point where the envelope follower is outputting about 1 volt.
The board has two unused features which could be exploited. There is a provision to add a lag control to the envelope follow control voltage. Also, by cutting a jumper, the preamp section can be separated from the input to the envelope follower and gate generator circuits, which would allow one to use the preamp for an instrument and then put its output through additional processing before inputting it to the follower.
Conclusion
To be honest, I had not previously considered buying any of the Oakley/Krisp1 modules solely because of the sucky (for Americans) dollar/pound exchange rate, which meant that a similar module from a North American source would nearly always cost significantly less. But when Krisp1 had their close-out sale on this module, I couldn't resist. I'm glad I made the purchase. This is going to be a very useful module, both for running conventional instruments through the modular, and for interfacing the modular to other synths. For instance, I could run the output of a polysynth into the EFG and use the control voltage output to control the cutoff of a VCF, adding an envelope-filter capability to the polysynth. Or, using the EFG in combination with a waveshaping circuit, I could make an approximation of a guitar synthesizer. My only comment is the small useable range of the gate THRESHOLD control. Other than that, it's a great module.
Sunday, April 17, 2011
Remove Before Flight: the making of a trance track
I've been wanting for a while to take a shot at an electronica track. I wanted to do it as a new challenge to myself -- I've listened to lots of electronica, but have not tried writing any before -- and as a way of putting some rhythm and melody back into my music. I've been doing a lot of atonal experimental stuff lately and I needed to get back in the groove, figuratively and literally. Here is the result, from my Web site.
The Web site writeup describes the who-did-what for this track, but I wanted to go a bit more into the decision-making process here. Remove Before Flight started out as a drum pattern. A very complicated, cluttered drum pattern. I started with a low tom (not a kick; more on that in a moment) hammering a 4/4, and added drum after drum until I had, well, a mess. Then I started taking stuff back out. I kept doing that until I had a recognizable pattern. The snare and cymbal play a bit while the tom keeps the beat pinned down. One thing I quickly recognized about it is that there is no obvious place for the "one" beat. When I put together the place where the first heavy pad sound comes in, I realized that I had started it on the wrong beat! I went with it, and there are several places in the track where "one" gets redefined, although it isn't glaringly obvious.
I had several specific things that I wanted to do with this track: (1) get the Kawai K5m involved; (2) build a modular patch involving the MOTM-510 WaveWarper; (3) experiment with Shepherd tones; and (4) put together an idea that I've had laying around for a while called the "drum console". The first two sounds that come in after the drum pattern starts -- the bass and electric-piano-like chords -- are both out of the K5m. I've done some stuff with the K5m before, but like a lot of people, I always found the additive synthesis method hard to get a feel for. However, after doing the Mississippi Statescape entirely with additive synthesis (albeit using the simpler Minky Starshine plug-in), I felt like I was ready to take another crack at it.
I started with a patch that I had built previously for part of Solar Flare. I tweaked on that, looking for an interesting melody patch, but it turned out to work better as a bass patch. Then I created another patch for the pulsing electric-piano-like sound. I recorded both of these as virtual tracks, so when I did the mixdown I had to put the K5m in multi mode, which I've never used before, and take the two patches out of separate outputs. And by doing that, I discovered something: the K5m is a lot quieter in multi mode! I'm not quite sure why this is; I think the K5m sums all five outputs together when it's in single mode. The K5m is known for being rather noisy; I've done the mod on mine to increase the output levels, but it's always tough to get the gain staging with it set up right. But from now on, whenever I record the K5m, I'm going to use the multi mode even if I'm only using it monotimbrally. (I found out something else interesting: in the multi mode, you can decide how many voices to allocate to each patch! I don't know of any other synth that lets you control the voice allocation in multitimbral operation this way.) Using poly mode 2 chops off the release phase of each note when the next note starts, giving more of a feel of a monosynth without using the 106's notoriously odd-sounding unison mode.
The high-pitched thing that sort of sounds like a pipe organ is from the JD990. Except for at the beginning, this is always layered with a big pad patch from the Matrix-1000. This turned out to be a good combination, with the somewhat shrill patch from the JD990 layered with the bassy and rather muddy Matrix-1000. I created the 990 patch specifically for this; the M1000 patch is one that I've had laying around. There are several things in the M1000 patch that are modulated by aftertouch to produce a somewhat unsettling detuning effect, which you can hear as the "chorus" portions of the track trail off into the quiet parts. It's a great demonstration of the M1000 modulation matrix.
The track actually uses three different bass patches. I started out with the K5m bass in the quiet parts, but I decided it was too up-front. I remember a patch that I had put together on the JD800 to emulate an electric bass. The basic patch is two layers; I had defined it with a third, disabled layer in an attempt to emulate an 8-string bass. That didn't really work out, but playing it way down at the far left end of the keyboard, it made a great near-subsonic bass for the quiet bits of this track. I knew that neither the K5m nor the JD800 basses would work as the sustained bass that I needed for the big choruses, so for that I created a third bass patch using the V-Synth. This patch has the ability to vary the low end harmonic content using the panel performance knobs (and corresponding MIDI CC #'s), which I use at the final chorus part. I mentioned using a low tom instead of a kick in the drum pattern. I did that because I knew I would be using a deep bass patch at some point in the track, and I don't like a kick drum cluttering up the bass spectrum. My observation is that when you do a track like this, you have to make a choice -- either use a deep kick and keep your bass patch in the mid-bass region, or use a deep bass and don't use a kick. Most electronica producers usually do the former, but I think I prefer the latter. (Must be my progressive-rock background coming through...)
I wanted a sequence that would capture the simplicity of a modular driven by an analog sequencer, but I didn't want to actually use an analog sequencer because (1) I didn't want the sequence to be quite that tick-tock, and (2) I don't have an analog sequencer. Having Metro drive the Juno 106 with a repeating pattern turned out to be just the thing. Funny thing about this: The sequence was one of the first things I did after putting together the drum pattern. I started it using a piano-like patch on the 106 as a placeholder, and I kept using that while I worked on other parts of the song. When the track was almost finished, I finally went back to it to create the patch I had intended, but nothing seemed to work quite as well as the piano patch, even though that patch wasn't what I had in mind and wasn't at all right for the track. I finally sort of compromised with myself by creating a patch that sort of sounds like what you'd get if you took a Wurlitzer and ran it through a wave shaper and an octave divider. This got me closer to what I wanted the sequence to sound like, without sounding too retro. The key to this patch was using gobs of the sub-oscillator, which has a different sound than the primary pulse waveform set to 50% duty cycle.
The Discombobulator plays a big part in Remove Before Flight. In the first quiet segment, there are a variety of sound effects produced using FM techniques. At the first of the year, I purchased three MOTM-310 micro VCOs from someone who was breaking up a large modular, with the specific intention of using them for FM patches. I set up a three-operator patch with one VCO modulating the second one, which modulates the third one. The first VCO is operating at a lower frequency and itself being modulated by an LFO. This patch uses triangle waves as the modulating waveforms; I've found that this often produces more interesting results than the sine waves used in the classic Yamaha FM synths. For this patch, no keyboard or other controller was used; I produced a track of about five minutes' worth of various sounds by tweaking the knobs. I recorded the audio in Metro and then chopped the track up into bits, about two minutes' worth of which actually made the final cut.
In the second quiet part, there's a series of atonal melodies. This was done using the MOTM-510 WaveWarper, which is sort of a super-duper ring modulator that takes three audio inputs and performs an analog computation on them. Two of the 310s were set to an interval (minor third, more or less) and sent to the X and W inputs of the 510. The third 310 was set to a lower frequency and modulated slightly by the low-frequency noise output of an MOTM-101. To play this, I used a keyboard interfaced via the MOTM-650 MIDI/CV interface. I configured a group of two channels and set the group to unison mode. An interesting feature of the unison mode is that if you play one note, both channels output that note. However, if you play two notes, the two channels split and each one takes one of the two notes. Each channel was fed to the control input of one of the 310 VCOs. By doing this, I could play the fixed interval that the 310s were tuned to by playing one note, or play another interval by playing two notes. Unlike the FM patch, this was not pre-recorded as an audio track; I recorded it as MIDI and played the track along with the other synths during the virtual mixdown.
The Discombobulator did one other function: That organ-like patch from the JD990 that I mentioned? It went through the Encore frequency shifter. I configured an aux output on the MOTM-650 to respond to mod wheel (MIDI CC #1) and used that control voltage to control the shift amount. The up-shift and down-shift outputs went to two channels of the mixer and were panned left and right for a stereo effect.
I did the Shepherd tones with Csound, as I have described in a previous post. I captured this as an AIFF file directly from Csound's output. This was imported into Metro and processed as described in the previous post.
The drum console is something that I'll say more about in a later post. One of my frustrations with conventional drum machines is that there is no easy way to change the pitch of the drums you select; for example, on the DR-202, you can change the pitch by going into the drum kit and changing it for that drum assignment in that kit, but it requires menu diving and is something you can't do at performance time. I've been wanting a way to play a particular drum sound over a range of pitches, to simulate e.g., roto-toms. So what I did is: I wrote a Csound program that loads a set of eight drum or percussion samples, and maps each one to a range of eight MIDI notes. Depending on the note played, it shifts the sample up or down, over a range of about half an octave. To play it, I use a Monome 40H, which has 64 keys in an 8x8 arrangement. Each row of the Monome corresponds to one sample; as you go from left to right on the row, it plays the sample at higher pitches.
Because the keys of the Monome aren't velocity sensitive, I coded the Csound program to take input from a Korg Nanocontrol to set a "velocity" parameter for each sample. Each of the 1 through 8 sliders on the Nanocontrol maps to one sample. When the slider is full up, the sample plays pretty much unaltered in dynamics. As you move the slider down, the attack time is increased; the volume is decreased, and a bit of low-pass filtering is applied. At low settings this actually produces a rather unrealistic attack sound, but I though it was interesting so I left it that way. Also, the rotary knob that goes with each channel is used by Csound to pan the sample.
I recorded the drum console parts as MIDI data from the Monome and Nanokontrol (which was tricky because I had to use the OSX IAC bus, and anytime you use the IAC bus you have to be very careful that you don't create a MIDI thru loop). So during the virtual mix I had this playing back through the Csound program. I routed the audio to its own output pair on the audio interface and to the mixer, where reverb got added. So, the resulting audio went from the digital domain to analog, and back to digital again. I learned a lot doing all this. It produces some interesting results, especially with the volume and attack manipulations. I want to extend this idea so I have a lot more control over various parameters and modifications of the samples. One other thing I learned is that the Monome isn't ideal as a drum pad controller; the buttons are kind of spongy and they have too much give for good drum pattern playing, in addition to not being velocity sensitive. But I don't know of any drum pad controller on the market that has 64 pads.
For the mixdown process, I had 12 MIDI tracks going on the various instruments, with everything being fed to the Mackie CR1604 mixer (of which I used all but one input channel, and all four of the effects returns). Nearly all of the mixing was pre-automated by setting up MIDI volume and pan commands to the various synths, so that once I had set the initial levels at the mixer, I didn't have to touch the faders during playback. There was a little bit of riding the master levels to avoid too much clipping -- I didn't use any compression. After that had been recorded to two-track in Metro, there were two additional (stereo) tracks that had to be mixed with the main two-track inside the box. One was the FM sounds from the Discombobulator, which had been chopped up from a longer track. The other was the Shepherd tones, which I wanted to keep in the digital domain, and anyway I had not set up the Shepherd program to be MIDI-controllable. That final in-the-box mix produced the track that you hear.
Remove Before Flight is Part I of the Flight Trilogy, all three of which will be electronica of some sort. I'm just starting to think about Part II. It will be called either "Sea of Crises" (a geographic feature on the Moon) or its Latin equivalent, "Mare Crisium". Right now I'm thinking it will be a downtempo piece, but I haven't decided that for sure.
Thursday, April 7, 2011

Subscribe to:
Posts (Atom)