Sunday, May 31, 2009

Electricity for Synth-DIY'ers: Inductors and Coils

I'm not going to write extensively about inductors, because they aren't used much in synthesizer circuits. The main reason I am writing about them is because they are, in a mathematical and engineering sense, complementary to capacitors. It is necessary to know a bit about in inductors in order to fully understand reactance, which is the over-arching principle that determines how AC circuits behave in the presence of both inductance and capacitance. Also, we need to describe inductance in order to understand how transformers and relays work.

An inductor is basically a coil of wire, which might or might not be wrapped around a metal bar or rod, or some other cylindrical object. You often see inductors in a circuit as coils of what appear to be bare copper wire, wrapped around a cardboard or plastic core. The copper is not actually bare; it is coated with a thin enamel insulation, similar to enamel paint. The reason enamel-insulated wire is often used for inductors is because it is thinner and allows the coils to be placked tighter, and also because it tolerates higher temperatures than most PVC-based wire insulation. The most frequently seen enamels are either clear, or have a reddish tinge that makes the copper look especially gold or red in color. Unlike nearly every other basic electrical component, inductors can be home-made fairly easily, and electronic supply houses sell prefabricated cores of certain lengths, diamaters, and materials for wrapping copper coils around to make inductors.


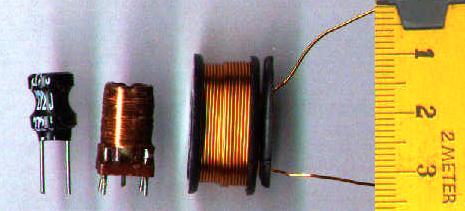
Inductors (image from Wikipedia Commons)


Inductors in DC Circuits

So what does an inductor do? The idea is simple: it fights any change in the current flowing through it. If a constant DC current is applied to an inductor, the inductor will, in theory, have little or no effect (the resistance of the wire may act like a low-value resistor). However, if anything causes the amount of current that is flowing to change, the inductor will fight that change. If the current tries to increase, the inductor will limit the rate at which the current can increase. Here's where it gets interesting: It will also limit the rate at which the current can decrease -- if the current tries to decrease, the inductor will actually "suck" current through in an attempt to keep it constant! The inductor does this by developing a voltage across it, from one end to the other, that tries to keep the current constant.

Here's a thought experiment. DO NOT ACTUALLY TRY THIS! Imagine a circuit with a battery connected to a switch and a large-value inductor, all in series. Initially, the switch is off, so no current is flowing. Then, we turn the switch on. What happens? The inductor does not allow the current to go to maximum immediately. Instead, the current ramps up gradually. Eventually, it reaches the maximum current that the battery is capable of supplying, but if we have a really large value inductor, it will take some number of seconds. If we had an ammeter or a scope with a current probe monitoring this, we could see it going up slowly at first, and then faster as it approaches the maximum value.


What happens when we turn the switch off? The current tries to go to zero immediately -- and the inductor doesn't like it one bit! It will develop a LARGE voltage in an attempt to "suck the current through", and very likely it will draw an arc across the switch contacts! This is why I said in the previous paragraph not to try this (unless you have a well-equipped lab and your fire insurance is paid up).

Inductors in AC Circuits

So in a DC circuit, an inductor can do drastic things when large step changes occur in the current, but as long as the current is in a steady state, nothing interesting happens; the current simply flows through. But what about an AC circuit? After all, a fundemental characteristic of AC is that the voltage, and hence the current, is changing all the time. Well, the obvious answer is that the inductor will resist all of the changes in the current, and it will do so in a manner that tends to keep the average current at a midpoint value. If we assume that the waveform is symmetrical, then the average current will be at the midpoint between the top and bottom peaks. If we further assume that the waveform has no DC offset, then that midpoint value is zero. Which means that, in effect, the inductor is acting like a resistor to the AC current.
At this point, we note something about AC. As we know from the Fourier theorem, all alternating signals are made up of sums of component sines. Let's consider two sine waves, both of the same peak-to-peak magnitude, but one of a low frequency and one of a higher frequency:


Low-frequency sine (green) and high frequency (red).
The dashed lines show the maximum slopes.

Note the slopes of the two sine waves where they cross the axis. You can see that the high-frequency one is rising and falling at a greater slope, and hence a faster rate, than the low-frequency one. So if we run both of them through an inductor, what happens? Per our discussion above, the inductor will resist both of them, but it will resist the higher-frequency one more. The inductor is acting like a frequency-dependent resistor, whose value increases with frequency -- which makes it a low-pass filter. You may recall seeing the previous sentence in the capacitors discussion. In fact, in an AC circuit, the inductor does the opposite of what the capacitor does; the capacitor is a high-pass filter; the inductor is a low-pass filter. And you can do, in theory, most of the same things with inductor-based filters that you can do with capacitor-based filters.

However, in reality, inductors are rarely used as filters in modern audio equipment. The reason is that small inductors are only effective in the RF range; an inductor-based filter for audio requires a huge inductor. There are practical problems with large inductors; besides the physical size, weight, and cost in copper, they also have the unfortunate habit of acting like radio antennas. A large inductor will pick up electromagnetic noise from other circuit components and the surrounding environment. (This is actually how a guitar pickup works. The magnet in the pickup sets up a field that is interfered with by the vibration of the guitar's strings. The pickup coil senses this interference and converts it into a signal. And as any guitar player who has played a guitar with non-humbucking pickups will tell you, the pickup coil also senses any other interference in the room and converts that into a signal too.) This is why you don't find many inductors in synths or other audio equipment.

Inductors, Electromagnets, and Applications

One other thing that an inductor does is create a magnetic field. This field is inside the coil and extends from one ends of the coil to the other, and slightly outside at each end. If you put an iron bar inside the coil, then when current is flowing, the bar becomes a magnet. This is precisely what an electromagnet is. If you mount the bar so it can slide in and out of the coil, then when current is flowing the magnetic field will pull the bar into the coil. If you then connect a spring to pull it back when the coil is not energized, you have a solenoid. If you connect a switch to the piece of iron, you have a relay. Relays are useful for allowing high voltage circuits to switch low-voltages ones on and off, or to allow DC circuits to switch AC circuits, or vice versa.

Transformers

If you run AC through the coil, you will obviously create an alternating magnetic field. One thing that an alternating magnetic field can do is induce a current into another coil that happens to be wound around the same core. This is precisely what a transformer is. A transformer is a power-converting device.

Recall that power, measured in watts, is calculated as:
watts = EI
where E is the voltage and I is the current. Now, in the transformer world, they don't use the term watts; they call them "volt-amps", or VA, instead. There's a reason for this that I won't get into; if you've ever heard the term "power factor", it has to do with that. The two coils of a transformer maintain a constant VA; VA in equals VA out. However, the voltage is not constant; it is determined by the ratio of the number of turns in the coils. If the primary coil (the one the power is applied to) has 100 turns, and the secondary coil (the one the current is being induced in) has 50 turns, the ratio is 2:1, and the voltage across the secondary coil will be half that applied to the primary coil. Since the VA is constant, that means the secondary coil will supply twice the current applied to the primary coil. That's how the power supply in a synth steps down the high mains voltage to the low voltages used by the synth circuitry. It's also how the output transformer in a tube amplifier converts the high-voltage signal from the output tube into the lower-voltage, higher-current signal needed to drive the loudspeaker. (And it should be noted that the loudspeaker itself contains an inductor, which creates the magnetic field that moves the speaker cone.)

Specifying Inductors and Transformers

The basic unit of inductance is the henry (no kidding), abbreviated H. As it turns out, one H is a larger amount of inductance than what is generally needed for the purposes for which inductors are used in electronics, so most inductors you will see in electronics parts catalogs will be specified in millihenries, or mH. Inductors will also be rated according to their maximum current capacity.

Transformers are rated in terms of the volt-amp (VA) capacity, and the turns ratio. There is usually also a maximum current rating (which is a function of how the transformer is constructed) and a maximum operating temperature. The turns ratio tells you what output voltage you can achieve for a given input voltage, and from that you can figure the maximum output current achievable, and compare to the transformer's maximum current rating. Transformers often have a multi-tapped coil on one or both sides; some of the taps allow some of the turns on that coil to be bypassed, which effectively changes the transformer's turns ratio. This is common in transformers intended to be used in power supplies; there will usually be taps on the primary side to accommodate both U.S. 120V mains and European 240V mains, and there may be a third one for Japanese 100V mains. If the device containing the power supply is taken to a different part of the world, it can be adapted to a new mains voltage by moving the power input lead to a different tap, or perhaps through a switch arrangement which accomplishes the same thing. Some transformers also have multiple taps on the secondary side, that allows the transformer to supply two or more secondary voltages in one unit. Remember that transformer depend on an alternating magnetic field being set up by the primary coil, and so they only work with AC voltages.

Summary

That's as far as I'm going to into this topic. There's a lot about inductors that I've ony hinted on, because the topics are more relevant to power engineering than they are to electronics. But if you are interested, do some Internet searches on the terms "reactance" and "power factor". As it turns out, when you get into these topics, you will discover that capacitance and inductance are two sides of the same coin, and there is some hairy but interesting math that arises.

Saturday, May 9, 2009

Electricity for Synth-DIYers: Capacitors

The next electrical component we're going to talk about is the capacitor. A capacitor is basically a storage device for electric charge. It's somewhat similar to a battery, although the analogy only goes so far: a battery stores electrical energy by converting it to and from chemical energy. A capacitor does not do that; it simply collects and stores charge.

A capacitor consists of two metal plates, each attached to a conductor, and separated by some type of insulator which is referred to as the dielectric. When the two plates of a capacitor are connected to the two poles of a battery or some other source of DC current, current flows in. At this point we have to talk about electrons, since they are the charge-carrying particles at the atomic level. Recall that the charge of the electron is negative, and that the flow of electrons in a circuit is in the opposite direction of "conventional current" (that is, conventional current flows from positive to negative, but electrons actually flow from negative to positive).


So electrons flow from the negative pole of the battery into one plate of the capacitor. They can't flow over to the other side of the capacitor because of the insulating dielectric. The dielectric won't permit a flow of current through it, but it will allow electrons to collect on its surface. The electrons on the negative side of the capacitor develop an electric field, which repels like charges in the same way that a magnet pole repels the like pole of another magnet. So what happens is that as electrons build up on one side of the dielectric, the electric field shoves electrons off the opposite side to the other plate and then out of the capacitor. That side of the capacitor then develops a positive electric field (absence of electrons). This process causes a voltage to develop between the two sides of the capacitor. This voltage opposes the voltage of the battery, which causes the flow of current into the capacitor to slow down. Eventually the voltage across the capacitor equals the battery voltage, at which point the flow of current into the capacitor stops. The system is now in a stasis condition. No matter how much longer you let the circuit sit there, nothing else is going to happen

Now, remove the battery from the circuit. What we have left is a charged capacitor -- essentially, another battery (although it holds a lot less energy, unless it's a really huge capacitor). If you then have a switch that you can use to collect the two sides of the capacitor together, the electrons will flow back out of the negative (excess electrons) side, through the circuit, and back around to the positive (deficient in electrons) side. As this occurs, the voltage across the capacitor drops. Eventually, the number of electrons on each side equals out; at this point the voltage across the capacitor is zero, and the current stops.

Controlling the Charge and Discharge Time

With a typical capacitor, if there is nothing external to restrict the current flow, the charging and discharging processes will both happen extremely fast. Putting a resistor in series with the cap slows down the charge and discharge rate, which leads to one of the main uses for capacitors in DC circuits: timing. This is commonly referred to as an RC circuit. Here is an RC circuit used to implement a crude form of AR envelope generator:


When the pushbutton switch (the symbol to the right of the battery) is pressed, the top half closes and the bottom half opens.  The battery is connected to the capacitor through the resistor, and the battery charges the capacitor.  As it does so, the voltage at the output goes up gradually.  Releasing the button opens the top half and closes the bottom half.  This disconnects the battery, and it completes a circuit from one side of the capacitor to the other, through the resistor.  The capacitor discharges through the resistor, and the voltage at the output gradually goes to zero.  A variable resistor or potentiometer could be used to vary the charge and discharge rate.  

The amount of time it takes for the capacitor to reach a given level of charge, at a given supply voltage, is determined by the capacitance of the capacitor and the resistance of the resistor; this is called the time constant. For a given resistance, the charge/discharge time is very repeatable, and the voltage to which the capacitor is charged will also be very repeatable provided that the supply voltage is stable. By convention, the time constant is given as the amount of time it takes to charge the capacitor to about 63% of its full capacity, which also means that the voltage across it will be 63% of the supply voltage. The calculation is simple:

time = RC

where R is the resistance in ohms, and C is the capacitance in farads (which we'll discuss further down).  It should be noted that the charge rate is not linear; as the capacitor charges, the opposing voltage begins to push back against the inflow of current, and the charging rate slows down.  As a rule of thumb, it takes 5x the time constant for the capacitor to reach full charge.

Capacitors and Alternating Currents

So far, we've talked about capacitors and direct currents. How does a capacitor behave with an alternating current? Well, let's think about it, based on what we've discussed so far. The distinguising characteristic of an alternating current is that it switches back and forth from current flow in one direction to current flow in the other, and hence the voltage switches between positive and negative. If we place a capacitor between the two poles of an AC source, and assume that we start with the positive-going half, then the capacitor behaves as described previously: it charges until its voltage equals the source voltage, and then current stops. However, when the AC switches direction, it is no longer opposing the capacitor voltage; rather, it is reinforcing it. So the capacitor first discharges, and then charges in the opposite direction. Again, its voltage eventually equals the source voltage, at which point the current stops until the AC changes direction again.

But what if we use a high enough AC frequency that the cap doesn't have time to fully charge before the direction reverses? We find that the AC current never fully stops, except for the actual moments when the AC waveform itself is crossing through zero volts, on the way to the other side. In fact, if the AC frequency is high enough, we find that the current flows in and out of the cap the same as it would if that part of the circuit were bypassed with a wire. It looks like the AC current is going through the capacitor! We know it actually isn't; the electrons can't pass through the dielectric. But the alternating flows in and out behave exactly the same as if they did.

And the higher the frequency of the AC current, the less impedence the capacitor poses to it. Impedence is just a fancy word for resistance in the AC context. The capacitor is behaving like a frequency-dependent resistor -- which is exactly what a filter is. The cap is a simple high-pass filter; it blocks low frequencies (and DC, which has a frequency of zero), and lets high freqencies pass. Nearly all filters used in synthesizers are based on the frequency-dependent behavior of the capacitor. Note that a simple capacitor is a long way from a practical VCF, but it's still the basis of one.

If the capacitor is placed in series with the circuit, it acts as a high-pass filter:


If the capacitor is connected between the circuit and ground (e.g., the negative side of the battery), then it "shorts out" the high frequencies. The low frequencies that can't pass through the capacitor go past it as if the capacitor wasn't there. So, in this configuration, the capacitor acts as a low-pass filter.

When using a capacitor as a filter, it would be nice to know what the cutoff frequency is. The problem with the circuits as shown above is that the exact cutoff frequency is highly sensitive to the small resistances in the wiring of the circuit, the internal resistance of the capacitor (no capacitor has absolutely zero internal resistance), and so forth. We solve the problem by putting a resistor into the circuit. Even a relatively low-value resistor of, say, 500 ohms, will probably be much greater than the parasitic resistances in the circuit, and it will overwhelm their effects. By doing this, we can now use the time constant that we discussed above to calculate the cutoff frequency. Remembering that the time constant is equal to R * C, we have:

Fc = 1 / (2 * pi * R * C)

where R is the resistance in ohms, C is the capacitance in farads, Fc is the cutoff frequency in Hertz (cycles per second), and pi is the familar circle ratio constant, roughly equal to 3.1416. (If you spend time looking at filter formulas and calculations, you will see the constant pi pop up frequently. There are mathematical reasons for this that are too complex to go into here.) Note that RC filters are single-pole filters, with a cutoff slope of 6 dB/octave. Most filters used in synth circuits are either two-pole or four-pole types.

However, there are two important applications for capacitors where we often don't care exactly where the cutoff frequency is: DC blocking and power supply bypassing. All capacitors have the property that, if you have a mixed signal with both DC and AC components, the capacitor can separate the DC from the AC. One place where we often want to do this is in the inputs and outputs of various audio circuits. For example, at the input of an audio amplifer, we would like to be able to remove any DC present in the signal. Amplifying the DC serves no purpose; you can't hear it, and large DC offsets in the output can damage the amp or the speakers. Running the input signal through a suitably large-value (a few millifarads) capacitor will block the DC while allowing all of the AC components in the audio frequency range to pass through. On the other hand, in almost any electronic device there are certain circuit components, such as certain ICs, which are connected to the power supply and vary hugely from moment to moment in how much current they draw from the supply. When they do that, they introduce noise into the power supply. This noise can be picked up by other circuit components, and can introduce noise or extraneous signals into the circuit's output, or even cause the circuit to malfunction. Bypass capacitors are frequently placed on a circuit board to take care of this problem. A capacitor, connected between the power supply and the ground (and usually placed near the power pin of the noise-creating IC) will shunt the noise components to ground and get them out of the DC supply.


Capacitors in Series and Parallel

If you remember the discussion of resistors in series and in parallel from that post, you might recall that when two resistors are in series, their values simply add; when resistors are in parallel, they follow the "reciprocal sums" rule. Interestingly, capacitors behave in exactly the opposite way; caps in parallel add, while caps in series follow the reciprocal-sums rule. So if we have three caps C1, C2, and C3:

In parallel: C total = C1 + C2 + C3

In series: C total = 1 / (1/C1 + 1/C2 + 1/C3)

Types of Capacitors

Capacitors may use different types of contstruction and different dielectric materials, which effects the secondary characteristics of the capacitor, such as working voltage and the physical size of the capacitor.  Often the choice of dielectric is a tradeoff between those two factors.  for example, a capacitor that uses air as a dielectric can tolerate high voltages, but a large-value air cap will be physically huge.  A "better" dielectric can accommodate a higher charge density and make a smaller cap, but these dielectrics often cannot tolerate high working voltages.  The types you are most likely to see in electronics are:

  • Ceramic. These use a disc of ceramic as the dielectric. They are fairly stable, tolerate physical abuse, can take high voltages, and are inexpensive. You will see a lot of these used as bypass caps. Main disadvantage: because the dielectric constant of the ceramic isn't very large, they can't be made in high capacitance values; they'd be too large.

A batch of ceramic capacitors, of various values.

  • Metal-film: polypropylene, polystryene, polycarbonate. These are made of a sandwich of the dielectric material, which is a plastic film, with the plates consisting of either thin foil layers or a metal layer vapor-deposited on the dielectric. The whole thing is wound up in a roll, like paper towels, which makes for large-value capacitors that are very small. Polystyrene types are the most temperature-stable, but they don't take high voltages and are hard to find for some reason nowdays. Use these for applications where the exact capacitance value is critical, such as timing and VCO circuits. Polycarbonate is supposed to be second-best in stability, and it takes higher voltages.

A metal-film "box" capacitor, installed in an MOTM module.

  • Aluminum electrolytic. These offer high capacitance value in a given space. They use a paste or gel electrolyte that "forms" the dielectric when a voltage is applied to the capacitor. Most types are polar; they can only take charge in one direction. They appear mostly in power supplies, and in places in circuits where a very high capacitance value is needed and the exact value isn't critical. They lose capacitance value over time, declining to as little as 10% of the original value after 5-10 years. The electrolyte can overheat and leak, or burst the case, if the capacitor is used in the design improperly or if a circuit malfunction apples current to it outside of its design specs, or if the ambient temperature gets too hot. There are "bipolar" types which appear mostly in amplifier circuits as DC-blocking capacitors, and in loudspeaker crossover circuits.


Electrolytic capacitors. The gray ones are polarized; note the back stripe and the shorter leads which indicate the negative terminal. The black one is bipolar.


A large electrolytic that was used as a filter in an amplifier power supply. The gray stripe, just visible at the right, indicates the negative terminal.  Also note that the cap is marked with its maximum working temperature; these types are often used in applications where they get hot.
  • Tantalum. These offer the absolute highest capacitance value in a given space. They have tighter tolerances than the aluminum electrolytic types, and are less sensitive to environmental conditions. They cannot take high voltages, but the main reason they aren't used much in synth DIY is that they are polar, more expensive than electrolytics, and they have a rather distressing tendency to explode if a reverse voltage is accidentally applied.

  • Paper and mica. These aren't used much any more, but you will run across them in antique electronics. The paper types use an oil-soaked paper as the dielectric. They weren't very good. The mica types (mica is a mineral, a sort of natural glass) were very good, but ceramic types have similar specs these days, and mica is expensive. Few paper caps are in production any more; some mica types still are, but there is no compelling reason to use them in synth circuits.

Units of Measurement

The cpaacitance of capacitors is rated in farads, abbreviated F. As it turns out, because of the way the unit is defined, one farad is a huge amount of capacitance. Unless you work in power distribution, you're unlikely to ever come across a capacitor that large. Capacitors used in electronics are usually rated in microfarads (1/1,000,000 of a farad, abbreviated uF), nanofarads (abbreviated nF, 1000 nF = 1 uF), or even picofarads (abbreviated pF, often pronounced "puff", 1000 pF = 1 nF). North American usage tends to avoid nanofarads; caps in that range are usually expressed as a fraction of a microfarad or as thousands of picofarads. Europeans are more sensible and simply use nanofarads when called for. In most synth circuits, you will see caps ranging rrom a few pF up to about 100 uF. Power supplies will use larger ones for filtering, up into the tens of thousands of uF. Note: many mathematical formulas involving capacitors, including the ones in this post, require the capacitance to be stated in farads, not any of the smaller units. It can all be hard to keep track of.

How Capacitors are Specified

The capacitance value is specified in some sub-unit of farads, as described above.  Unfortunately, unlike the case for resistors, there is no really standard way of marking values on capacitors.  Some caps do use a RETMA-like color coding, but most are marked in text.  One system often used on smaller-value (and physically smaller) caps is a three-digit code, where the first two digits are the first two digits of the value in picofarads, and the last digit is a number of zeros to add to the first two digits.  So, for example, a cap marked "102" would be 1000 pF, or 1 nF.  Electrolytics, particularly larger ones, are usually marked with the actual value.  

There is far more variation in capacitor tolerance values then for resistors.  Most ceramic and film types are sold at 10% tolerance; 1% or better are available but are expensive.  Tolerance is often not marked; you have to look at the packaging to know.  Most electrolytics have terrible tolerance specs; +100%, -50% is not uncommon.  (Also keep in mind that electrolytics usually lose value as they age.  These are good reasons to use some other type in applications where the exact value is important.)

Secondary characteristics that are important in capacitors include whether or not the capacitor is polarized, the working peak voltage, the temperature coefficient (how the capacitance varies with temperature), the tolerance, and the equivalent series resistance or ESR. As we have discussed, most electrolytic and tantalum types are polarized; they can be charged in only one direction, and will be damaged if voltage is applied in the opposite direction (dramatically, in the case of tantalums).  The negative lead is usually indicated by a stripe on the body of the cap, or the lead being shorter, or both.

Working voltage is a function of the dielectric and the capacitor's construction. Some types of dielectric have better ability to withstand high voltage than others do. If an excessive voltage is applied to the capacitor, the dielectric breaks down, and then the capacitor shorts out or does something worse, such as burst or catch fire. When considering voltage ratings, you need to consider the peak voltage that the capacitor will be exposed to, and then allow some margin. Rule of thumb is to specify the cap for at least double the expected peak operating voltage. This is frequently fudged down to 50% or less when specifying large electrolytics, due to physical size and cost.

Most types of capacitors vary with temperature. For electrolytics in particular, this can be considerable, to the extent that manufacturers don't always publish data on it. For other types, there are usually several types or grades of variation with temperature. The Electronics Industries Association has a complicated system for designating these. Just know that if you are buying ceramic caps for an application that requires the least available variation with temperature, look for a type designated "NPO or C0G".

Equivalent series resistance, or ESR, can be caused by both resistance and inductance within the capacitor. ESR becomes a factor in circuits where the cap is expected to handle either large currents or high frequencies (1 MHz or above). In synths, you will usually not run into these situations except when dealing with power supplies. In a power-supply filtering application, it pays to get low-ESR types, since these will not get as hot and therefore will last longer. If you are working with digital circuits having high-frequency clock signals, say for a CPU, you may have to think about capacitor inductance, which causes higher ESR at high frequencies. The easiest way to avoid this problem is to stick to ceramic types whenever possible in high-frequency circuits; ceramics nearly always have very low inductance. (In power-supply filtering and decoupling applications, it is often recommended to use two caps in parallel: a film or electrolytic type to handle the higher currents and lower frequencies, and a ceramic to bypass the high frequencies.)  ESR may vary by frequency, and electrolytics often have high ESR at higher frequencies.  For that reason, it is not uncommon to find, in bypass applications, an electrolytic and a ceramic in parallel.  The electrolytic bypasses the lower frequencies, and the ceramic handles the higher frequencies where the electrolytic's ESR is too high.

Summary

Capacitors are fundamental to today's electronics.  It is important to understand them, since they in effect open the door to AC circuits and signal processing the treats different frequencies differently.  


Thursday, April 23, 2009

Adventures in Backlighting, Part 3: The K5m Lives!

So having figured out the cut-to-size EL sheet, it was time to put it to use. Out came the K5m to the workbench. Once I recalled how to open the jigsaw-puzzle case, I saw this:


The half on the left, laying flat, is the front panel. The right half is the rear half. A closer view of the front:


To cram the power supply into the K5m's case, they had to split it into two pieces. The transformers were crammed into a corner of the back part of the case, and the voltage regulators were put on a separate board, which is the tan-colored board on the left in the photo above. This board sits atop the LCD display board on standoffs, and it also contains the backlight inverter, which you can see below as the white box on the right. In this photo, the power cables have been disconnected from th board and it is in the process of being removed. To the right of the inverter, the small connector and (very short) cable that routes the inverter output to the display board is still connected. Note that if you have the keyboard version of the K5, this board is not here, but there is a ribbon cable that runs across the back of the display board. On the keyboard K5, you have to remove one of the panel boards to get the ribbon cable out of the way; see here. On the K5m, once you have the regulator board out of the way, the display board is free and clear.


Below is the back of the display board, exposed. Note the metal clips holding it in around the edge. To remove it, you must get some needle-nose pliers and very carefully bend those clips out of the way. They will only tolerate being bent so many times, and the pressure they provide to hold the board in is essential to the LCD working properly. Don't bend them any farther than necessary to get the board out. The gray ribbon cable at left is soldered in at this end, but can easily be unplugged from the CPU board at the other end. The dark green board below the display board is the panel board.


The top of the liberated display board, showing the LCD screen. The backlight is soldered in at the top end, in this picture. For the moment, we put this aside; we'll get back to it later.


The next step is to remove the dead inverter and retrofit the new one. Whatever brand of new inverter you buy, it's almost certain to not fit in the same holes as the old one. Here's the regulator board with the old inverter removed. The connector on the left is the inverter output going to the display board; the connector in the right is for the raw juice coming in from the power transformers.


Here's the regulator, which I mentioned in part 1. It's a Hantronix HVI-5E ordered from Mouser. It has three pins, in the same pattern as old inverter:
  • pin 1: +5V in
  • pin 2: common (return for both the +5 and the inverter output)
  • pin 3: inverter output, 90VAC @ 400 Hz


To my surprise, pins 2 and 3 of the new inverter actually fit in the same holes on the board. If I could just figure out what to do about pin 1, I'd be golden. I considered bending it over and running a jumper wire over to the hole, on the component side of the board. But then I thought of a cleaner solution: I could tell that the board was a single-layer board (hold up to a strong light if you have any doubts). Could I drill a hole for pin 1? Looking on the back of the board, there were no traces in the area that I had to drill. So I drilled a new hole. In the photo below, the old hole for pin 1 is below and slightly to the left of the drill bit:


Note: do this trick with a circuit board only if there are no traces nearby, and you are absolutely certain that it isn't a multi-layer board! Else you may cut an internal-layer trace, or accidentally short power to an internal ground plane, both equally nasty and non-fixable.

Success! Here's the inverter pins protruding through the back of the board. Note the lack of a pad around one of them; that's pin 1 in the new hole:


It was a trivial matter to install a jumper to connect the pin to the old hole location. Here it is, with the jumper installed and the pins clipped:


And the result. This turned out to be a good solution; the inverter is secure on the board, and the existing connector and cable to the display board are still functional.


Now, on to the actual backlight replacement. This turned out to be more trouble than I was expecting. First, the end of the existing backlight, which is a plastic piece that just slips in the slot between the LCD and the board underneath. It has these two tabs soldered in at the end, which are connected on the board to the cable that goes to the inverter:


Unsoldering the tabs is straightforward. Once that is done, the old backlight is just pulled out of the slot:


Here's what you see with the backlight removed. The grey are is the actual display area of the LCD. Note carefully the rubber strips at the left and right edges. Those rubber strips contain many tiny electrical connectors, which simply touch (they aren't soldered) many equally tiny surface-mount pads on the board. There is some kind of conductive glue holding the rubber strips to the board, and it isn't very strong. Also note that there are some exposed vias underneath the LCD.


Here's our new backlight, cut down to the proper size, and with two strips of conductive-glue copper foil attached to the tabs on the bottom, and crimped at the ends to form contacts. I took it to work and cut it with one of those guillotine-type paper cutters to get a clean edge.


Problem: the old backlight was insulated on the bottom. The new one has exposed conductive surface on the bottom, and we can't let that come into contact with those exposed vias. So I had what I thought was a brilliant idea: I'll just put the old backlight back in, unconnected, and put the new one in on top of it! That way, the old backlight will act as an insulator. It was a tight squeeze, but I crammed it in. Here's the result, with the copper foil tabs newly soldered to the pads on the board. I was so proud of myself...


... until I reassembled the display to the front panel and found that it the LCD no longer worked properly; it displayed black lines across the face, and had rectangular patches that didn't work. I took it back apart, and found that one side of the LCD contact strip had come unglued from the board. When I took it out, the whole backlight arrangement fell out the side! Disaster, I thought. At first, I thought it was unsalvagable, until I realized that since the contacts weren't soldered, maybe if I just put it back together without the stack of the old and new backlights forcing the LCD up, the pressure from the metal tabs that hold the display board in (and the display itself against the front panel glass) would hold it together.

At this point, it occurred to me what I should have done about the conductive backside of the new backlight: simply cover it with electrical tape. This I did, and once that was done, it easily fit back in the slot by itself (it's actually quite thinner than the old backlight). So, starting over from here again:


I was able to slip the new backlight back in, and since the LCD was coming up on one side, I was also able to get my finger in there with a piece of electrical tape to keep the copper foil from touching the board, while getting the tabs on the end of the backlight stuck back on to the ends of the foil tabs. After a couple of false starts, I got it back in there and got the whole thing reassembled, and all of the cables attached again. Here it is, nearly ready to close up; you can see the power transformers on the right:


Every time I open thing thing up, the metal case gets a little more warped and there are a couple of more case screws that won't go back in:


But it works! I can actually see the display again, and the light is a nice white color! Here it is in all of its additive-synthesis glory. (Weird shadows and colors were caused by reflections of ambient light in the room.) I noticed that the very top row of dots on the display is very faint, but I'm not going to mess with it; I really don't want to have to take that display board out again.


Now, while I had this beast open, there were a few other things that I could have done that are recommended for K5/K5m owners. If you go back to where the panel board is mentioned, you can remove that board and clean the button contacts (click on the link and scroll about 2/3 of the way down) to make the buttons work better. You can also upgrade the OS by installing a new ROM available from the Yahoo K5/K5m user group; the latest version for the K5m is 1.2, and for the K5 keyboard is 1.3. (It displays the OS version at boot time.) The ROM is socketed so it's an easy replacement. I had already done the button cleaning on mine in a previous servicing, but I do plan to buy the OS upgrade ROM and open it back up later to install that. And there is a mod to improve the output level (kfuenf again; scroll down to near the bottom); I had also done that previously.

Sunday, April 19, 2009

Electricity for Synth-DIYers: Resistors

As the name suggests, the purpose of a resistor is to restrict the flow of electricity through a circuit. Here's a few things that a synth-DIYer needs to know about resistors.

What are Resistors For?

Resistors are used to control the voltage in a circuit, or to control the flow of current through a circuit. We saw an example of the latter in the first installment of this series, where we used a resistor to limit the amount of current flowing through an LED. Resistors are often used to create a drop in voltage in a circuit. For example, if two resistors of equal value are wired in series between the two poles of a battery, the voltage at the point in between the two resistors will be half the battery voltage; this type of circuit is known as a voltage divider. Unequal values create different in-between voltages.

Resistors can be used to "convert" a current into a voltage. An example often seen in synth circuits is a resistor wired to the output of an OTA, an IC frequently used in analog synts. The OTA produces a specific output current which is proportional to its inputs. By placing a resistor on the output, a voltage is developed in between the OTA output and the resistor which is proportional to the OTA's output current.

A pull-up resistor is used to apply voltages to the inputs of components which act as electronic switches, such as JFET transistors and bilateral switches. The switch has an "open" or "closed" position, but in order for another circuit to sense that, some voltage must be applied to the switch input. A pull-up resistor between a supply voltage and the switch input provides the necessary voltage. With the output of the switch connected to ground, when the switch is closed, the measured voltage at the switch input will be zero. When the switch opens, the voltage at the switch's input will rise to the supply voltage, due to the pull-up resistor. The pull-up also limits the current when the switch is closed; otherwise, the switch would short out the supply voltage.

Similarly, a resistor wired between a voltage source and ground acts as a "pull-down". A high-value resistor is often wired to the external input of a circuit to provide some protection against static charges. Static electricity may have very high voltage, but very low current. A high-value resistor dissipates the static charge without "loading down" the circuit's normal input signal.

A resistor in series with a capacitory has an effect which is similar to reducing the capacitance value of the capacitor. This will be covered further in a later installment.

Ohm's Law

The degree to which a resistor resists is measured in ohms. The definition of an ohm is: if a voltage of one volt is applied to a resistance of one ohm, a current of one amp results. This leads to a basic formula of electricity, known as Ohm's Law:

E=IR

where E is the voltage, I is the current, and R is the resistance. (Why is E the voltage and I the current? E comes from an old term for voltage, "electromotive force". You do sometimes see the letter V used instead. "I" for current, I have no idea, other than the fact that "C" was already taken for something else.) Of course, you can do simple algebraic manipulations to find any quantity needed, given the other two; for example, if you know the voltage and the resistance and you want to find the resulting current, divide both sides by R, and you get:

I = E/R

Specifying and Choosing Resistors

In specifying resistance values, the ohm is represented by the Greek letter omega, which is: Ω. The usual metric multiplier prefixes can be added to this for larger values, for instance, 6 kilo-ohms would be written as 6kΩ, or sometimes just 6k if the context is understood. One ohm isn't much; typically, in electronics about the smallest resistance one encounters is 100Ω, and resistors with values in the megaohms range are sometimes called for. In practice, the omega symbol is often omitted when it is understood from context. A convention that is sometimes seen is that the resistance value will be written with either the letter "R" or the metric multiplier prefix placed in the number where the decimal point would go. So for example, 100Ω might be written as 100R; 1000Ω would be written as 1k, and 6800Ω would be written as 6k8.

Two other parameters are commonly given in specifying a resistor: the tolerance and the maximum power dissipation. Resistors are mass produced, in very large quantities, and the manufacturing processes are not perfect. As a result, it's actually rare for a resistor to measure as being exactly the specified value; it may be some small percentage more or less. Manufacturers measure and grade their resistors as to how close to the spec value they actually are, and then "bin" them up into tolerance ranges. As one might expect, the tighter tolerance ranges cost more. The most common tolerance range sold today is 5%, meaning that if a resistor is marked as a 10KΩ, 5% resistor, its actual value may be anywhere from 9500Ω to 10,500Ω. Besides 5% resistors, the other commonly available ranges are 1% and 0.1%. Electronic products built prior to about 1980 may contain 10% resistors, but resistor manufacturing processes have improved to the point where the 10% range is no longer marketed much, since there is no cost savings. When designing a circuit, the circuit designer will determine for each resistor in the circuit how much tolerance is allowable in order for the circuit to work, and then specify the tolerance based on that information.

Power Dissipation

Whenever a current passes through a resistor, some of the energy contained in that current is converted into heat. A resistor can only dissipate so much heat before it reaches a high enough temperature to destroy itself or nearby components. This waste heat, along with all other measures of energy and power production in the electrical world, is measured in watts. Note that the watt is not a quantity of energy; that's a common mistake. It is rather a rate at which energy or power is produced, flowed, or consumed. (In order to drive your car down the highway at a given miles or kilometers per hour rate, the engine must produce power at a certain rate. That rate of power production can be measured in watts, although in the case of automobile engines, "horsepower" is usually used instead. Horsepower is simply a different unit for the same thing: 1 horsepower roughly equals 750 watts.)

The power dissipated as heat will of course raise the temperature of the resisitor. To avoid cooking the resistor, the dissipation needs to be kept below the rating. If you know the voltage across the resistor and the current flowing through it, the dissipation is given by:

Watts = EI

Many times, in circuit design, you won't know the exact current, only the voltage applied to the resistor. Using Ohm's Law, you can substitute for I in the above:

I = E/R

so,

Watts = E(E/R) = E^2/R

The most common dissipation rating for the types of resistors used in electronics is 1/4 watt. 1/8 watt and 1/2 watt types are also common. In general, the dissipation rating is directly proportional to the physical size of the resistor. Types rated for more than 1 watt are usually large and difficult to package; they are also often built as "wirewound" types which have other effects on a circuit that must be taken into account in the circuit design.

Substituting Resistors

A few rules of thumb for resistor substitution:

  1. You can always use a resistor of tighter tolerance than specified. If a parts list calls for a 5% resistor, you can use a 1% or better resistor of the same value.

  2. You can use a higher-dissipation resistor than specified, provided that it physically fits in the space where it needs to go, and as long as you avoid wirewound types. If the parts list calls for a 1/4 watt resistor, a 1/2 watt or 1 watt one will work as long as it fits on the board. Don't use wirewound resistors unless the schematic specifically calls for it.

  3. If you are in a pinch for a resistor value you don't have, or if you need an oddball value, you might be able to assemble using some combination of series and/or parallel resistors; see the next section.
Resistors in Series and in Parallel

Sometimes, you need a resistance value that is not a standard value or not easily available. You can build different values by wiring up two or more resistors in series and parallel. The rule for combining resistors in series is simple: their resistance values add. Example: a 10K resistor in series with a 6.8K resistor adds up to 16.8K. Resistors wired in parallel are more complicated: the rule there is often called "reciprocal sums". Suppose you have three resistors, R1, R2, and R3 in parallel. You first take the reciprocal of all of their values and add those:

1/Rsum = 1/R1 + 1/R2 + 1/R3

Then, take the reciprocal of 1/Rsum to get the result. So, for example, if R1 = 1K, R2 = 2200 ohms, and R3 = 5000 ohms, the calculation is:

1/Rsum = 1/1000 + 1/2200 + 1/5000

1/Rsum = 0.001 + 0.00045 + 0.0002 = 0.00165

Rsum = 1/0.00165 = 604 ohms

Note that the resulting value is less than the lowest-valued resistor in the set. This will always be true for resistors in parallel. The technique can be extended to any number of parallel resistors. Simplification: if all of the parallel resistors have the same value, the result will be that value divided by the number of resistors.

To figure the dissipation of series or parallel resistors, you would have to work out the applied voltage for each resistor, which can be some work. Try this shortcut first: figure the dissipation treating the resulting value of the series or parallel combination as if it were a single resistor. If that is within the dissipation of all of the resistors in the combination, then it's okay.

Resistor Markings

Resistors often do not have their value printed on the resistor body; instead, they use what are known as the RETMA codes, which are the colored rings you see painted on the resistor body. In current usage, this will be a sequence of four or five color bands. Four bands, with one of them being a gold or silver band, indicates a 10% or 5% tolerance. To determine the value, orient the resistor so the gold or silver band is on the right. Then, read the other bands according to this code:

0 = black
1 = brown
2 = red
3 = orange
4 = yellow
5 = green
6 = blue
7 = violet
8 = gray
9 = white

For a 10% or 5% type, the first two bands indicate the first two digits of the resistance value. The third band indicates that the specified number of zeroes should be added on (Note: this is not the same thing as specifying a power of ten! Some resistors use more digit bands, and the same color last band indicates a different power of ten on these. To keep it straight, don't worry about powers of ten; just add on the specified number of zeroes.) So, for example, a resistor with the color code orange/green/red indicates:

orange: 3
green: 5
red: 00 (two zeroes)

The value is 3500 ohms. A gold band at the end indicates it's a 5% tolerance; a silver band indicates 10%.

1% and better types will have five bands instead of four. It can be a bit difficult to determine which end is the left and which is the right, but if you know the type, a brown band at one end will indicate a 1% type. A violet band indicates a 0.1% type; other values are possible. Read the other bands the same way: red/red/violet/orange indicates:

red: 2
red: 2
violet: 7
orange: 000 (three zeroes)

This is a 227K ohm resistor. Below are pictured five resistors. See if you can make out their values.


Top: violet (hard to see in the photo), green, brown, gold = 750 ohms, 5%, 1/4 watt. Second: red, red, red, gold = 2200 ohms, 5%, 1/4 watt.
Third: orange, yellow, orange, gold = 34K ohms, 5%, 1/2 watt (note larger size).
Fourth: red, red, yellow, gold = 220K ohms, 5%, 1/4 watt
Bottom: brown, black, green, gold = 1.5M ohms, 5%, 1/4 watt

Below are some 9.09K, 1/4 watt, 1% types. Note that they use a printed designation instead of the RETMA markings. This seems to be the way the high-precision types are going.


Here are some old 10% types -- note the silver stripes. You don't see these much anymore.


Specialized Resistors

We mentioned wirewound resistors earlier. You normally want to avoid these because they have a property called induction, which will be covered in a later installment. The induction can mess up the circuit that the resistor is in. You will seldom need one of these in music gear, but there is one place where you may run into one -- amplifiers. Reason: wirewound resistors can be made to tolerate very high dissipations, 5W and up. These are often called "power resistors", and sometimes they are needed to control the high currents found in a high-power amp.

A specialized type often found in synthesizers is the temperature-compensating resistor, or "tempco" for short. All resistors are somewhat temperature-dependent. But a tempco's resistance change at different temperatures follows a very specific formula. This can be used to compensate for other circuit characteristics that change with temperature. All VCO circuits that have volts/octave response need a circuit called an "exponential converter" to transform the input control voltage to drive the oscillator core, but the implementation that is generally used in analog VCOs is very temperature-sensitive. A tempco is essential to offset this in order for the VCO's tuning to remain stable as the circuit heats up.


Summary

Resistors are one of the most frequently used of the electrical components. They are available in a huge array of types and values. Sorting out the markings can be tricky, so look closely. If you have trouble remembering the color codes, there are "RETMA" calculators that have little wheels where you can dial up the colors and it will tell you the value.

Next installment: capacitors.

Thursday, April 16, 2009

Adventures in Backlighting Part 2


The glowing blob you see above is a piece of a cut-to-size EL sheet, glowing on my workbench. I finally got it to work last night. Here's a pic of it unpowered (and with the lights on):


And here is what it looks like in low light -- kind of spooky:


If you read the previous post, you know that I was having trouble with it: every time I connected a piece of the EL sheet to the inverter, the +5V power supply would shut down. I was getting the power from one block of the Discombobulator, which had a Condor triple-voltage linear supply, with the +5 rated at 3A. There was only one module using the +5 in that block, but I figured maybe it was drawing a lot of current, so I disconnected it. With this, there was nothing but the EL inverter drawing from the +5. Still no joy; it shut down as soon as I connected the EL sheet. The second thing I tried was to go get another Discombobulator block. One of the three has a switching +5 power supply rate at 5A. Trying it with this, the power supply didn't shut down -- the inverter itself did.

Well, this left me completely puzzled. Was the sheet I was trying to light too big for the inverter? I tried cutting off a small piece (the piece you see above) and just using that. No difference. What was going on? I checked the piece with an ohmmeter, and was surprised to get readings ranging from about 1300 ohms to 20K. An EL light, being a capacitive device, should read open on a DC ohmmeter.

Tried it again, under low light. When I did this, I noticed that I could see small arcs when I pressed the EL sheet's tabs against the connector, just before the inverter shut down. The arcs evidently weren't in the EL sheet itself, since they weren't leaving burned or melted spots. They had to be in the connector. I looked over the connector and didn't see any obvious shorts. But, just to see, I removed the connector and rigged up a pair of jumper wires with some copper foil tape to connect the EL sheet to the inverter.

Voila! That worked. Something in the connector is creating a low-impedence short circuit path. Perhaps it's the adhesieve that was used to glue the metal contact surfaces to the plastic case. But in any event, that connector doesn't work. That's okay; I will rig up something to install it in the K5m when I get ready to do that.

Here's a larger piece, illuminated. This is the piece I'm going to cut to size to fit in the K5m's display. The crennelations are where the connecting tabs are.


By the way, if you play around with these things long enough, and you aren't very careful about the conductive surfaces, you will get zapped by the inverter eventually. And it will hurt. 90V at 400 Hz really stings. Lesson learned from recent experience.

Sunday, April 12, 2009

Adventures in Backlighting Part 1

My K5m needs a new backlight.  Has for some time, actually... and, unfortunately, most of the places that were carrying them a few years ago seem to have disappeared.  So I figured I'd try a DIY approach.  

I know from having tested it previously, using a battery-powered inverter and a length of EL wire, that both the backlight itself and the inverter are bad.  I ordered a sheet of EL material and connectors from Electroluminescence.com's small-quantity online store, along with some connectors.  It's a cut-to-size sheet, so I can cut it to fit into the space inside the K5m's LCD display.  For the inverter, I ordered a Hantronix HVI-5E from Mouser; it appears to be about the same shape and size as the existing one, and should be easy to retrofit.  The inverter's output is spec'ed as 90V at 400 Hz.  

First, I set it all up on my workbench:


I'm using the power supply from one of the function blocks of the Discombobulator to power this experiment.  The inverter is shown plugged into the experimenter socket in the center of the picture.  It takes +5V DC.  The EL sheet is the foil-colored panel to the right (this picture shows the reverse side).  Here's a close-up of the connection:


Here's the front side.  It's only pink when it is not powered; it is supposed to light up white.


Unfortunately I haven't gotten it to work yet.  Every time I connect the sheet, the power supply shuts down.  It also does that if I try to probe the inverter output with the scope.  If I just hold the probe close to the connector, I can see the AC waveform on the scope and it looks good, but the moment the scope probe touches the conductor, no more power.  Haven't figured that out yet; I don't know if it's overloading the +5, or if the inverter does something nasty that tricks the protection circuit.  I guess I'll need to try a different supply.  


Sunday, April 5, 2009

Electricity for Synth-DIYers: Volts and Amps

This is the beginning of a series that I'm starting to talk about the basics of electricity, as it applies to synth players and DIYers. I'm not going to get too much into theory in this series, but I'll start it with a basic discussion of what electricity is and how it's measured. Later posts will focus on electronics components, what they do, and how they are specified, as well as provide a few basic circuit examples.


What is Electricity?

All materials are composed of atoms, and molecules composed of atoms. An atom is made up of a nucleus surrounded by electrons. In non-conducting materials, all of the electrons are pretty tightly bound to their respective nuclei. However, in conducting materials (metals mainly), each atom has one or more electrons that are loosely bound and can swap around with electrons from adjacent atoms. Normally, they do this at random, zinging around in arbitrary directions. However, if one applies an electromagnetic force to the conducting material, the electrons can be made to move in a certain direction. Since each electron carries a specific amount of electric charge, this movement constitutes electricity.


No, Really, What is Electricity?

Electricity, for most practical purposes, is the flow of electric current from one place to another. Electronics is the engineering craft of designing electrical circuits to create and process various forms of signals that are converted to or from electrical signals. (One of the advantages of electrical energy is that it is easily converted into other forms of energy, and modern industry has invented all kinds of devices for doing so.) In our context, we are mainly talking about electrical currents that will eventually, when piped through an amp and speaker, be converted into sound. Our first concerns about any flow of electrical current are always: (1) Which direction is it going? (2) How much electricity is flowing? (3) How much "pressure" is there motivating the electricity to flow? The quantity of electricity flowing, and in what direction, is referred to as "current" or "amperage", and is measured in amps. The unit is designated with the letter A in a specification, such as 1.5A for one and one-half amps. The "pressure" is referred to as "voltage" and is measured in volts, designed with the letter V in a specification, e.g., 15 volts is 15V. The usual metric prefixes can be used for millivolts/amps, kilovolts/amps, etc, so 30 mA is thirty milliamps.

Water analogies are often used to explain the basics of electricity. It's something one has to be careful about, because the analogy only goes so far, but it does help explain the basics. Electricity is similar to water in that you cannot "compress" it; if you push a certain amount of electrical current into one end of a wire, an equal amount of curent has to come out somewhere else. You can "use up" voltage, but current in always equals current out. If you think about a water supply pipe, there are two things that determine how much water you can get out of it: how much water is in the line, and how much pressure there is making the water move. Voltage is analagous to the amount of pressure in a water pipeline, while current (amps) is the amount of water moving through the pipe. The amount of pressure has an effect on how much water moves through the pipe, but the size of the pipe has an effect too. A bigger pipe can carry the same amount of current as a smaller pipe, at a lower pressure.

Lighting is an example of an electrical current with high voltage but a relatively modest number of amps flowing. Electricity produced by a van der Graaf generator is an even more extreme example: the voltage is in the millions of volts, but the current is very close to zero. At the opposite extreme, in the 1980s, I worked on some computer systems that had power supplies that output 400 amps at only 2.6 volts. This is sort of the electrical equivalent of the Mississippi River -- there's an enormous amount of water flowing through the Mississippi, but at a very low downstream pressure.

How much is a volt? One volt isn't much. Small batteries of the AAA/AA/C/D types put out 1.5V nominally. You'll note that you can hold these in your hand, with one finger on the positive terminal and the other on the negative terminal, and not feel any electricity flowing. "Square" batteries that use the snap-on connectors are 9V; most automobile batteries are 12V. Modular synths often use plus and minus 15V power supplies. The minimum voltage that is usually considered to pose any threat of electrocution to a human (assuming that one is in reasonably good health, and not doing anything stupid like standing in water while working on a circuit) is about 20V. A moderate-powered modern amplifier might have power supplies running at about 60V. Old vacuum tube (valve) circuits needed higher voltages; 200-300V is common for guitar amps. These voltages are definitely lethal and must be respected. Power distibution in homes in most countries takes place at 220-240 volts; 120V is used in the USA, Canada, and a few other countries.

By comparison, one amp is a fairly generous amount of current. On North American power, a 100W incandescent light bulb uses about 1A of current. Power distribution branch circuits in houses are usually in the 15-30A range. Electronics circuits (other than power amplifiers) usually deal with currents in milliamps or smaller.


You Can't Compress Electricity

I already said it above: as in the case of water, you can't compress electricity. If you push an electric current into one end of a conductor, an equal amount of current has to come out somewhere else. This is an important concept, and it leads directly to the notion of electrical circuits. Wherever electric current comes from, it eventually has to go back there, in a closed loop. Water can be "conducted" by almost anything; nearly all substances allow water to flow over, around, or through them, so building a water circuit isn't that hard conceptually. However, there are a lot of things that don't conduct electricity, at least not very well, including the air around us. As in the case of stagnant water, electricity that isn't moving and has no path to move cannot do useful work. So it is always necessary for electrical circuits to be constructed in closed loops. Current in always equals current out; wherever the source of current is in a circuit, there has to be a path for the "used up" current to get back there. That's way batteries and generators have two poles: current comes out of one pole, and goes back in the other one.


Resistance and Ohm's Law

Outside of semiconductors, all electrical circuits have some resistance in them; they tend to resist the flow of electrical current to at least some degree. The amount of current that flows through the circuit is inversely proportional to this resistance, and directly proportional to the voltage that is motivating the current. Turning to the water analogy again, if you consider a pipe that is straight and has very smooth walls, it has little resistance to the flow of water through it. So it doesn't take much pressure to make a lot of water move through the pipe. On the other hand, if the pipe has rough interior walls (e.g., old galvanized pipe) and a bunch of twists and turns, it has higher resistance, and requires higher pressure to deliver the same amount of water flow.

The same thing happens in electrical circuits. Increased voltage will make more current flow through the circuit; increased resistance will lessen the current flow. These relationships are described by Ohm's Law, which is the basic law of electricity:

E=IR

where E=voltage (in volts), I=current (in amps), and R=resistance (in ohms).


A Few Basic Circuits

Below is the most simple circuit possible.  It consists of a battery and a resistor.  The symbol with the short and long lines represents the battery; the plus sign shows which end represents the positive pole of the battery.  The squiggly symbol represents the resistor.  This is standard symbology for electrical circuit drawings.  

This circuit doesn't do much; all it does is create heat when the current flows through the resistor.  The next circuit is more interesting.  It adds a light-emitting diode, or LED, to the circuit.  


You're familiar with LEDs; they generate light of a specific color when electricity passes through them.  The round symbol containing the triangle and line, plus the squiggly arrows coming out, represents the LED.  The arrows have to be there to emphasize that this is an LED and not a regular diode, which doesn't create light and is used for a different purpose.  

What is the resistor doing in this circuit?  It limits the flow of current through the LED.  The LED itself (unlike a regular light bulb) has very low resistance; if it were connected directly to the battery, so much current would flow through it that it would quickly burn up.  

The third circuit is a variation of the above.  It allows the brightness of the LED to be varied:


The resistor circuit with the arrow through it represents a variable resistor, one that has some mechanical means (such as a knob) for adjusting its resistance.  The two resistors together, the fixed one and the variable one, make up what is known as a "voltage divider".  Depending on the setting of the variable resistor, some of the current will flow through the variable resistor and bypass the LED; the rest will instead take the "short cut" through the low resistance of the LED.  You've probably heard of a potentiometer, or "pot" for short.  A variable resistor is one way a potentiometer can be wired up.  


AC/DC (And We're Not Talking About Angus Young)

Here's where we start to make things more complicated, and where the water analogy starts to break down. So far all the circuits we've discussed have been direct current (DC) circuits. In a DC circuit, current flows from the positive side of the current source, around the circuit, and back to the negative side of the current source. Pretty simple. However, in an alternating current (AC) circuit, the current doesn't go all the way around the loop; instead, it constantly changes direction. In this case, the current source doesn't have a fixed positive or negative terminal; at any given time, one side is positive and the other side is negative, then they switch directions.

So what good is this? For one thing, as it turns out, AC is a more efficient way of delivering a lot of electrical energy. The reasons why are complex and I won't get into them now, but this is why the power circuits in your residence are AC and not DC. (Thomas Edison, who designed the world's first commercial electric power distribution grid, tried using DC. But competitors using AC were able to put him out of business.) Of more interest to us is the fact that an AC current is a perfect analog for a sound wave travelling through the air. Sound waves are also alternating waves, and it's easy for an electrical circuit to convert sound waves into electrical waves. The device that does this is, of course, the microphone. And the device that does the opposite, turning electrical waves into sound waves, is the loudspeaker.


Stop, That Hertz

If the current follows a repeating pattern (waveform) alternating at a consistent rate, then one "cycle" is considered the time from some arbitrary starting point in the waveform to the point where it begins to repeat the just-completed pattern. The time it takes for one cycle is known as the "period". Measuring that time in seconds, and then taking the reciprocal, gives the frequency, which is the number of times that the alternating current alternates in one second. The unit of measure for frequency is the "hertz" and is abbreviated Hz; by definition, 1 Hz is one cycle per second. The word "hertz" has only been in common use since the 1960s, so in old radio and TV manuals from before that time, you may see frequency units given as "cps", which is the same thing (cycles per second).

AC circuits have more complex behavior than DC circuits. An AC current may consist of a blend of different componets, or partials, alternating at different frequencies. The device known as the oscilliscope will show you what the composite waveform looks like, but to find all of the individual components, you have to perform a mathematical operation known as a Fourier analysis, which we won't get into right now. The one important point to remeber is that the "purest" type of wave is the sine wave; this consists of exactly one partial at one given frequency. All other waveforms are made of combinations of two or more sine waves. Electrical power is distributed in the form of a sine wave, alternating at 50 or 60 Hz depending on what country you live in. The audio frequency range is conventionally given as ranging from 20 to 20,000 Hz. Commercial FM radio transmission in North America takes place in a frequency band centered around 100 MHz (megahertz, or millions of cycles per second); TV channels 1-6 are at frequencies somewhat below the FM band, while TV channels 7 and higher are above the FM band.


Ben Franklin Flips a Coin, Comes Up Tails

Thus far, we've treated current as if it comes from the positive pole of a battery, and flows towards the negative pole.  You probably know that electrical energy is carried by the atomic particle called the electron; electricity moves by means of electrons moving from atom to atom through a conductor.  Now, here's were we deal with an unfortunate consequence of a random guess.  Someone back in the 18th century (one legend has it that it was Ben Franklin) had to take a 50-50 guess as to whether the electron is positively or negatively charged.  They guessed that the electron is positively charged.  Unfortunately, they guessed wrong, which means that when we speak of current flowing through a circuit in a given direction, the electrons are actually moving in the opposite direction.  So our convention, of assuming that current moves from positive to negative, is exactly the wrong way around.  Nonetheless, electrical engineering, by long-standing convention, continues to treat current this way; "conventional current" flows from positive to negative, while electrons actually flow from negative to positive.  Circuit designs continue to this day to be drawn and the math computed in terms of conventional current, and for basic circuits, this works fine.  It usually only becomes important to understand the distinction when studying the physics of how certain semiconductors, or vacuum tubes (valves) work.  

The next installation in this series will deal with resistors: what they are, how they work, and how they are specified.